Various events and every day happenings of our quiet life in Port Orange, FL.
Includes community events, travel, home projects, food, gardening and a lot of our pup Rufus.


Showing posts with label home projects. Show all posts

Tuesday, February 23, 2010

Much awaited guest bath reveal

By popular demand, the reveal of our guest bath. Ready for this - the whole thing, new ceiling, floor, we kept track down to the nail (well, screw) and caulk - less than $2500! There are still a couple open items: window covering, seal liner between tile wall and tub top, some accessory items (towel hook is purchased, needs to be hung, and need to get matching tub handle). I'm not 100% sold on the shower curtain either, but the price was right and it was in stock. Let me know what you think! We're very happy with the way it all turned out. We did most all of the work, and had our friend who is a plumber help with the water lines, tub install and tips and tools for a lot of the other projects. Our master bath is next on the reno list.

Shower curtain is actually from Walmart. We tried this one from BBB but it was too heavy and dry clean only! Ugh! I had wanted this one from BBB, but they were out of stock for several months. Now it's back in stock, but has chrome hooks which won't match our finishes. I found this light weight one at Walmart for $20. I love the see through fabric on top, bonus white hooks, double bonus, machine washable! Yes, I need to steam it to get the wrinkles out.
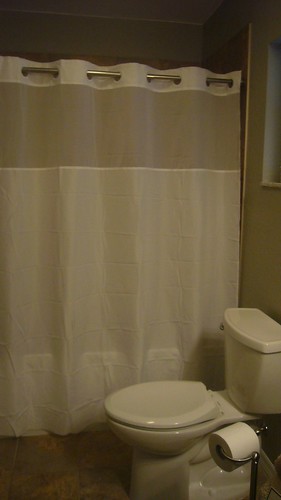
Tilt your head for this pic. After aches and pains with drilling the water holes in the tile, we decided on a tension shower rod rather than the curved rods that are drilled into the tile for now. This one works nicely, enough elbow room in there.

I'm really happy with the tile choice. It was DH's. I hated it in the store, but under our lights, love it! The wall color is a grey/tan Woodlawn Colonial Grey from Valspar color matched at Home Depot because I just love Behr paint. Toilet's American Standard Cadet 3. The little cabinet on the left is the one from BBB noted in a previous blog.

Here you can see a little of the heavy shower curtain we took back. For window coverings, I'm probably going to order woven wood bamboo shades from http://www.blinds.com/. They've done all of our other window coverings in this house. Great prices, fast shipping, great customer service.

The toilet paper holder is great. No extra reaching across for the paper. Before, it was mounted on the vanity, but since we shortened it from 48 to 36", that would be an extra reach too. Do you know how expensive bath trash cans are? $30+! We got this one from BBB as a 'just for now' can, but it's growing on me. The price grew on DH - $10 and then $5 coupon, so $5! I like how it's dark on the inside and brushed metal on the outside.

I would still like to put something between the can and the 'can' there for height. Maybe a 3 ft vase with bamboo or reeds in it. I've been checking out Ross, and will check out Home Good when they open at the Pavilion March 10!

The hardware is Moen Sage. We weren't going to replace the mirror, but after seeing the size relation to the new shortened vanity, we had to. Got a good deal at Lowe's on this one. Towels and bathmats are Laura Ashley Lifestyles Microcotton Bath Towels in Twine (always wait for a sale at Kohls!)

We were able to refinish the vanity. Took off (1) 12" pc, stained the front wood doors (very time consuming, clean, scuff, stain, repeat, repeat, repeat, repeat!). The sides are laminate, so they didn't take the stain well. Ended up using a good spray paint in espresso. Looks great! New hardware for $10, new granite top, new faucet (with single handle and soap dispenser) and we saved a lot vs. purchasing a new vanity (which I tried to do, but couldn't find any I liked anyway!)

Thanks for following our adventure in our first big reno. Let me know if you have any questions on any reno money saving ideas, project how to's or product info.

Sunday, January 3, 2010

Guest bathroom recap

Yes, I've been a total blog slacker. For a couple months our weekends were full of bathroom renos, then who knows what, Flu, Thanksgiving, then a few weekends in Orlando for mini-vacations and then Christmas and New Years and here we are.

Our guest bath was finished just before Thanksgiving which was at our house again this year. There are still a few open items like window covering (which I'm waiting to find exactly what I want since the glass is frosted and opens to the patio so privacy isn't an issue), tissue holder, trash can and a couple extra towel knobs. We were successful in our first tiling project. We called in the professionals when we started on the shower walls, but that was just our neighbor for a consult. He drew some lines and we were good to go. Cutting the holes for the water lines was a pain in the butt. So worth the $20 diamond crusted drill bit. Grouting - easy. Sealing - easy. Drywall and backer board - easy. Knockdown spray texture was terrible for me. It didn't affect DH's eyes at all, but mine were watering so much I couldn't see straight. I ended up putting on a mask and my snorkel goggles and that helped. DH did the electrical and our plumber friend did the moving of the pipes, install of the tub and final hookups. We are VERY happy with how it turned out.
Here are the reno highlights. I'll do a final reveal on the next blog. Along with a before and after.

Installed by DH - new from Lowe's Harbor Breeze Brushed Nickel fan with light (and bonus night light feature!)
Tub in. We went with the Kohler Archer tub with brushed nickel hardware. Drywall and Hardibacker board up.
Rufus the site supervisor. This was during the terrible texture spraying. We did a light coat on 1 wall and let it set. Rufus wasn't allowed in until the smell/eye watering chemical went away. Yes, he's always that jolly.
And the hole that finally cut nicely. We went through about 5 tiles before I went back to Home Depot to get the diamond drill bit.

Friday, September 11, 2009

Guest bathroom reno - the big items

After seeing the bathroom completely bare, it's nice to do some screen shopping and pick out what's going to go into that nice, spa-like bathroom.

The biggest piece that's on order is the tub.
I wanted a deep soaking tub that would fit in the 5 ft. space without breaking open any extra walls. There were a couple less expensive options, but they had poor reviews, mostly about cracking within a year of install. Some were probably not properly installed with the required support, but still, I wanted a good, quality tub. Kohler has always been a trusted name, and although we didn't go with a Kohler toilet, we knew they produced great quality products at affordable prices. Plus they've got great customer service. After pages and pages of tubs, I decided on this one, the Kohler Archer K-1123-LA-0. It's a 19 inch deep tub and with the low stepover height and the unique overflo drain, you can get a full 19 inch soak with minimal water drainage. Not to mention the armrests and lumbar support. The tub will be delivered by Home Depot next week! The drain was a separate purchase. Little on the pricey side for hardware, but hopefully worth it! I went with the brushed chrome finish. Most of our home is brushed nickel, but Kohler's brushed nickel looked more brown-yellow than what I like. Brushed chrome is more like stainless steel. I'm looking forward to soaking in this one!

We've got a small nook in the guest bath due to the linen closet and the guest bedroom closet. It's a space that's 11 inches deep and about 30 inches wide. We found this great piece that fits perfectly! Lancaster Floor Cabinet - Espresso, BBB. Since we're changing the vanity size from 42 inches to 46 inches and adding this across from it, we won't be losing any valuable storage space. I love the glass door too. It's a surprisingly sturdy piece for the price. DH said it was pretty easy to put together.

We looked all around for a new vanity, but couldn't find one we liked for a reasonable price. We had already found out our vanity was 2 pieces and made of solid wood, so we decided to try a DIY craft project - staining. So far, we've done 3 coats of Minwax Polyshades One Step Stain & Polyurethane in Bombay Mahogany. It's just brush it on, wait to dry, lightly sand and repeat. Pretty simple, time consuming, but since we're saving the vanity, we'll have some extra wiggle room in the budget. I've still got to make the final decision on the tile, but I'm pretty sure we're going with this granite vanity top for our freshly stained vanity, Home Depot's Pegasus 37 In. Beige Granite Vanity Top With White Bowl. We're also looking at Lowe's Style Selections 37"W x 22"D Desert Gold Granite Vanity Top and will make the final decision after the tile is chosen. They're both pretty much the same - it'll probably come down to price and which one is in stock. Please don't look at the Lowe's choice, that pic on their website is terrible.

Planning on putting the vanity together Sunday. Look for some before and after pics soon.

Tuesday, September 8, 2009

Guest bathroom reno - demo!

I'm sure you've been wondering what we've been up to as far as home DIY projects. Well, DH had off from work on Friday and this is what I came home to.
DH had a lot of demo time that day. Saturday morning, we finished the demo. Yes, even the ceiling came out. DH was cutting the tape around the edge and since we were going to scrape the popcorn ceiling off, move the light and add a vent, we just decided to tear it down and start the whole thing from scratch.
In case you didn't catch our before, here it is in it's dated glory.

The only things that are staying are the toilet which is new anyway and hopefully part of the vanity which I've been trying to stain to match an espresso piece that's going in there. The mirror will go in our master bath for now.

Next blog I'll show you the new soaking tub that's on order along with some of the new pieces and colors! Untill then, here's why you should wear eye and nose/mouth protection while doing demo - DUST everywhere!

Thursday, March 26, 2009

Robellini plant bed

Here's what I started with Saturday morning, a clean slate. DH was called into work, so I went out to the nursery
And picked up a few plants - here's a large agapanthus (lily of the nile), 2 smaller agapanthus, and 3 aztec grass to start. Oh, and there's 2 small golden dew in the back. They're ok in shade and get pretty big, so I didn't want them to hide the others in the front.
Then I went to Lowes and Home Depot. Lowe's had flax lily and society garlic 3 for $10 - a 1 gal flax lily was $7 at our local nursery and society garlic was about $4 there too. So, I picked up 3 flax lily and 2 society garlic. I also wanted some form of yucca that could take the sun for the right corner. I found this at Target for $10 - good deal! It's a 3 cane yucca, resistant to 0 deg F, likes full sun and can do good on frequent waterings.
So far, this is what we've got - I counted, I planted about 21 plants this weekend! We went with yucca cane on the right corner, agapanthus, aztec grass, society garlic, flax lily, golden dew and canna - but many many of each.

Last addition to come soon will be a Mandevilla (formerly Dipladenia). There are many different colors - white ‘Summer Snow’, yellow, pink, red. For now, I'm set on 'Sun Parasol Crimson' aka Red Riding Hood, because I've heard that is most resistant to bugs. I'm going to try to train to climb the small part of the fence shown at the left, it's about 6ft high and 3 ft wide before the swing gate. It's a flowering vine, sometimes called Brazilian Jasmine that is great trellised in containers or in hanging baskets. This will be the only plant out front that's not rated to withstand freezing weather.


But I also like the other colors. The pink may go better with our lavander azaleas. We'll see.


Tuesday, March 17, 2009

Happy St. Patty's Day!

Today is St. Patrick's Day and yes, I'm wearing green! I've had corned beef and cabbage cooking all day in the crockpot and we may even go out for a green beer. I'm not even a hint of Irish, but I think DH is a little, so for tradition's sake, we're Irish for the day.

In other green news, we picked up and planted our 4 trunk robellini this weekend. It looks great! I've been having to hand water the azaleas due to the recent heat and drought, and they're looking good too. We had some rain last night, but don't expect any more for at least another week, so more hand watering until they're established. What do you think? And notice the new fence on that side of the house. We're extending it to be flush with the house
Sunday night was the last night launch for the shuttle. It was perfect - so clear we could see everything. Here is Discovery on it's way to space around 7:30pm. The reflection of the sun setting made the smoke look like a rainbow. More photos as viewed from our front lawn on flickr

Thursday, March 12, 2009

Belated blogging


First things first, today is my Aunt Joyce's birthday! HAPPY BIRTHDAY!!

I know, I've been MIA in blogger world for the last couple of days. To tell you the truth, the weather's been so beautiful and since it doesn't get dark until around 8pm now, DH, Rufus and I have been living outdoors everyday after work until we absolutely have to come inside. We've been playing in the garden, planting plants, going on walks, and last night DH was teaching me how to golf. Real golf, not putt-putt!
Thankfully he set me up to practice with a pitching wedge on a part of the grass that has been affected by bugs, so there's not much grass to start out with there - and after I was done, it was like I used a tiller! I would either swing 6 or so inches ABOVE the ball or dig the club into the ground sending dirt everywhere. Rufus enjoyed that - typical boy, loves the dirt. After several complete misses, I started to get the hang of it and actually hit about 3 or 4 good shots. Oh, that reminds me, I have to go into the neighbors yard and get one of our golf balls. (DH hit that one - I was learning with little wiffle-like balls, so they wouldn't go very far even if I did make contact.

DH and I have tickets to the Gatornationals for tomorrow and since we're leaving early tomorrow morning and staying over in Gainesville Friday night, Rufus gets to stay over at grandma's for 2 nights. I mentioned it to him last night, he does know the word 'Grandma', but I made sure to tell him, 'not right now'. I don't think he has a sense of time, but he knows what that means. I know he's going to have a blast!
This is our front yard. The first photo shows the ixora that didn't survive the cold, once again. This plant is beautiful when flowering, but it's not cold hardy enough for our area. So, we went out to the nursery this weekend and got some azalea plants. So far they're doing great. Eventually, they'll bloom to look like the second photo below.
I'd like to start a notebook where I keep all the detail info on all the different plants we have in our yard so that I can remember their scientific names and also remember their likes and dislikes and other data. So, this is what I've compiled for the species of azalea we have in our front yard now, Azalea, Formosa Lavender.
Full name: Rhododendron simsii 'Formosa Lavender' - Azalea: Formosa Lavender Southern Indian Azalea
Size: 6' - 8' tall, 6' - 8' wide (can reach 15 ft in height), slow grower
Bloom: 4" Pinkish Lavender, in Early May - Formosa is a twice-a-year bloomer!
Leaf: Green
Natural attraction: butterflies
Light and soil: Full Sun or Shade, Acid and humus rich Soil, Blooms on Last Years Growth

Notes:
- Water regularly until established and during dry spells for best performance. Maintain a mulch layer year round to conserve moisture and limit pesky weeds. Prune after flowering to maintain desired shape and height.
- This is considered to be an old-fashioned heirloom plant which endures popularity amongst gardeners. Minimal care and it withstand drought, heat and cold (hardy to 10 degrees F).
- The 3 inch blooms of the shrub often completely cover up the leaves showing off its beautiful lavender color. Lavender blooms that turn deep pink or magenta hue during the fall, depending on where you live.
I'd like to try pairing with Autumn Royalty Encore Azalea, Azalea x 'Conlec', the Azalea that blooms up to 9 months a year, but we'll see how these hold up for a while.

Friday, February 27, 2009

Effects of a freeze

Winter is a strange season in Florida. Most winters we can be out on the beach every day, some winters we have to light the fire. This winter has brought a few good, cold freezes and our plants are there to remind us of it. Before we went out to CA, we had 2 nights below freezing and we covered all the plants. While were were out in CA, there were a couple more nights of freeze and when we got back, we had a lot of trimming to do. Below are the bananas and elephant ear a few months ago at their peak and third is a photo from last weekend. Their leaves were all wilted and brown so we had to trim them all back. Don't be sad, we're seeing green sprouting through and there's actually 1 leaf about to open up so there's still hope! A couple of the smaller ones I don't think made it, but we'll keep them in the ground for a few more weeks to be sure.


The crotons didn't survive at all. They all dried out so quickly, you wouldn't even be able to tell they were there. Our nightblooming jasmine didn't make it, but it had a fungus before the freezes. The areca palms are brown, as are the bird of paradise but I see some green on birds. The ixora and ficus trees out front were all brown and we trimmed them back last weekend. There's new green leaves coming out so they're all clear. We also modified the front flower bed so that it's not taking over the whole yard and walkway anymore and made the outline for a new flower bed with room for a tree or bush. Don't mind the dirt, it's covering transplanted grass that seems to be taking to its new home.
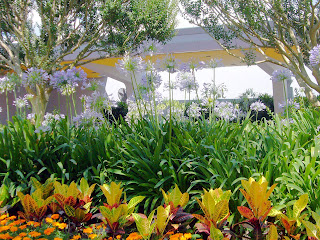
One plant that did well through the cold is the lily of the nile, or Agapanthus. This is great news as these are ones we love - nice big green leaves with beautiful flowers in the spring and summer. We first saw these at Epcot last year. Wonder what Disney puts on theirs to make them so big and full?
Who knows if we're past the freezing temps. Forecast for early next week show lows in the upper 30s. Usually by mid-March, the weather warms up for Spring Break, so we'll see.

We've got a nice weekend planned. DH went golfing out at LPGA today with his dad. Saturday we're doing some work around the house and yard - weather looks perfect, upper 70s. Saturday night our church is starting Saturday Night Life church and that's where we'll be. And we're also going out with DH's dad for a belated birthday dinner. Sunday our friends are playing a gig out at JB's Fish Camp so we're going to support them and eat some delicious rock shrimp! We'll have to bring our jackets as there's 40% chance rain and a high of 62! But tonight, it's a movie and Giuseppes for pizza and wings.

Oh, and side note. Partylite Summer Catalog goes into effect April 1. That's a long time to wait!

Wednesday, January 28, 2009

Weekend Recap 2

After dropping Ruf off for his haircut Saturday, I stopped at the local nursery to check out trees for our front yard. They had both foxtail and queen palms, but also a Christmas palm which I think I like the best of the palms. A little older gentleman Arlon pointed them out to me. It's fairly reasonable in the price of palms and it is basically 3 or 4 palms in 1 as there are several different trunks. It still has nice palmy palms and is pretty easy on the upkeep. Arlon suggested if the temps were to get in the 30s, a couple spot lights in the yard facing up would be both aesthetically pleasing and also keep heat and warmth on the tree. We also looked at other options including robellini's and some type of Japanese plum and of course citrus trees.
Then it was home to meet what was hopefully our last window estimate appt. This guy was from Window World, which is a national company that lures most in with their $189 installed window. He was friendly and knowledgeable as usual. He did bring up a good option on our windows - slider style rather than the standard double or single hung up and down windows. Now, we don't have mountain view, but this is similar to what a slider on our front window would look like, except it'll have 4 full sliding glass sections due to the size of that window.

And this (except not detail on the glass) would be what our bedroom and office windows would look like.It definitely surpasses current egress requirements, and I like that it's just large pieces of glass (they'll still be impact resistant). And it's just different than the standard up and downs. There's a house right down the street from us that has this style, I'll probably go chat with them after we get back from CA.
Window World wasn't the least expensive, but wasn't the most either. I haven't heard of their brand of windows, so I'm still leaning towards PGT windows which several people carry and love. I didn't have the other people quote slider style windows, but I think it's not that much more for this style.

Other than that, we watched a couple movies this weekend and did some shopping We saw Righteous Kill with DeNiro and Pachino and Bangkok Dangerous with Nicholas Cage. Righteous Kill was ok, wouldn't have been good at all without Al and Robert. Interesting fact, in their first movie together The Godfather 2, they were both gangsters, the next Heat, one was gangster one cop and in this one, they're both cops. And Bangkok Dangerous was terrible. Wouldn't even had made it to the movie theaters or into our DVD player without Nicholas Cage. He's basically an assassin, but they throw a couple extra story lines in there that slow the move to a screeching hault and oh, just save your self and don't watch it.

Countdown until San Diego - we leave Friday! Off to dinner at Outback with the girls!

Thursday, January 15, 2009

Landscape curbing


We're in desperate need of some landscape curbing for our front flower beds. We tried the black plastic edging and that just warped and didn't hold in the mulch. Then we tried something DH came up with: slats from wood fence panels cut to size angled on top stuck in the ground. We had extra fence panels to use (although they do sell strips of wood for this purpose - see photo). It was sort of like a picket fence for our flower bushes. We set them too close and didn't allow for expansion, so they're all laying all over the place now. The ones from the store are pre-spaced with wires to make install easier, allow for expansion and to help keep them in place.

We looked into stone borders from Home Depot similar to retention wall stone. They're about $1.50 per stone and for our 80 ft. line, we'd need 2 layers which would be about $300 plus all that time and lifting. Plus it would take away from the visual height of our flower beds since 2 levels of stone would be about 8 inches high. So then we started looking into concrete edging. Typically, this is done by a professional with a concrete forming machine that he just runs down the outline of the prepped border and wha-la, permanent edging to withstand the rain, sun, sleet and snow. There's all types of stamping and color options to decorate the concrete. There's even different forms to make the border a different shape.

This first one's supposed to look like cobblestone.
These two like real rocks with texture. I'm not a big fan of the one on the left - the random lines are not orgainzed enough for me. The one on the right is ok. It may be an option as this shade would match the brick front.


But the one I like the most is the plain concrete color in mower's edge style. The concrete is natural gray color, I say classic, some may say boring. See the little lip near the grass, this allows the lawn mower to ride right up to there assuring an even mow all the way up to the edging.

We had 1 guy come give us an estimate, and if you know me, you know I've got to check all my options and compare prices, so we've got a 2 more companies coming over to give us an estimate. Hopefully I'll have some nice 'after' pics soon so I can do a before and after post.

Tuesday, January 13, 2009

Sinks

In one of last weeks blogs I mentioned how I like large sinks. I've been checking out farmhouse style sinks, sometimes also called apron sinks. I was surprised to find they make stainless versions. I had always seen the standard glazed porcelain or whatever material they are. I don't know if the stainless apron will be too much stainless being right next to the dishwasher (I'd probably keep the appliances in the same places for the remodel).

Here's a couple examples of a stainless single tub (no divider between the sides, what is that for anyway, I keep moving the dishes from one side to the other!) next to a stainless look dishwasher. I could almost bathe Rufus in that thing! The only issue would be lifting his 100 lb. butt up that high :) The first photo has cabinets close to what we're looking to get.
One important feature we would have to check if we did go with stainless farmhouse would be that it was fingerprint resistant, like our other appliances.
Or we could go with the standard white, which may not look too bad since the sink is below the window and the new window frame will be white.
This photo shows the white farmhouse sink under the window like ours would be. Also has the semi-dark cabinets that I like (I actually like a little darker I think). I've got a lot of spices and am always thinking of new ways to efficiently store them. This shallow cabinet on the side is a neat idea, although I would definitely have some type of cover or doors over that because all of those different jars not matching would bug me right away. If all of the spices were in matching jars, that may look nice there. Anyway, focus on the sink in this photo. The counter top brownish shade may be nice too.

Or we could just go with a larger (36 or 30 inch) single bowl stainless sink. (bonus for stainless, rub your hands on it to help remove food smells like garlic and onion, and it would match our appliances).
I'm not too big of a fan of this first one. The rounded corners just make it look strange to me. But it is a big stainless single bowl sink. It's Lovello.

I love these next two. The 'zero radius' corners just make it look so deep (all 3 of these stainless bowls are about 10 inches deep). I like the dark counter top on the second one.
This shows that stainless sink along with the Adel Medium Brown cabinets from Ikea that I like. I'm not that into the green back splash, but do like the lighting. This is similar to the layout of one side of our kitchen.